
“There’s more than one way to skin a cat.”
— Unknown
Introduction
After getting a Synology DS920+ as a NAS, it was obvious that it would be the perfect media server at home. After running Jellyfin for over a year on a VPS, my wife and I were both comfortable with it and didn’t want to make a switch to Plex. I also figured it would be a good time to move Pi-Hole from the Raspberry Pi to the NAS instead.
What’s covered?
- We’ll install Portainer for Docker container configuration and administration without the need for SSH.
- Install Pi-Hole and set up some custom DNS to resolve hostnames
- Install Jellyfin via Docker
- I’ll also cover installing Wireguard and configuring a split-tunnel to access your services.
- Installing DIUN (which I assume stands for Docker Image Update Notifications) to get notifications when Docker Images are updated
- Setting up local DNS entries in Pi-hole and Reverse Proxy entries in Synology for friendly hostnames
Installing Portainer
There’s more than one way to skin a cat. You don’t have to install Portainer, of course. You could also choose to install any of the below apps using the command line or running Docker Compose commands yourself.
To install Portainer:
- Install the Docker package
- Make a directory called docker where you can store all the configs
- Make a directory inside docker called portainer-ce
- Run a scheduled task that is set to run only once as root and use this as the command:
sudo docker run -p 8000:8000 -p 9000:9000 --detach --name=portainer-ce --restart=always -v /var/run/docker.sock:/var/run/docker.sock -v /volume1/docker/portainer-ce:/data portainer/portainer-ce
- Portainer will then be running on port 9000
Installing Pi-Hole
- First, find your user’s UID and GID
- SSH into the Synology box and run id from the command line
- Take note of the UID and GID for the docker-compose
$ id
uid=1026(your_nas_user) gid=100(users) groups=100(users), 101(administrators)
- Create a new stack in Portainer and paste the following code:
version: "3.8"
services:
  pihole:
    image: pihole/pihole:latest
    container_name: pihole
    environment:
      - PIHOLE_UID=1026
      - PIHOLE_GID=100
      - WEB_UID=1026
      - WEB_GID=100
      - TZ=Africa/Windhoek
      - WEBPASSWORD=<very-secret-password>
      - DNSMASQ_LISTENING=local
      - WEB_PORT=8889
      - ServerIP=<ip-of-synology> #e.q: 192.168.0.120
      - DNSMASQ_USER=pihole
    volumes:
      - /volume1/docker/pihole/dnsmasq.d:/etc/dnsmasq.d
      - /volume1/docker/pihole/pihole:/etc/pihole
    ports:
      - 53:53/tcp
      - 53:53/udp
      - 67:67
      - 8889:80
    network_mode: host
    restart: unless-stopped
- Make sure you change the DNS address used in your router to point to the Pi-hole instance
Installing Jellyfin
version: "3.8"
services:
  jellyfin:
    image: jellyfin/jellyfin:latest
    container_name: jellyfin
    network_mode: "host"
    volumes:
      - /volume1/docker/jellyfin/config:/config
      - /volume1/docker/jellyfin/cache:/cache
      - /volume1/Media:/media #root share of all your media
    restart: "unless-stopped"
Installing Wireguard
Notes:
- Here we install WG-Easy – which gives Wireguard a simple web-interface
- Some might find the https://hub.docker.com/r/linuxserver/wireguard more to their liking – I have had success using this image on Ubuntu, but I can’t say I have installed it on the Synology
- https://github.com/ngoduykhanh/wireguard-ui also looks really good, but again, I can’t say that I installed it on the Synology
- For more info on the AllowedIps, have a look at https://github.com/pirate/wireguard-docs#allowedips
- The following links are very helpful and way more detailed than I could ever be:
version: "3.8"
services:
  wireguard:
    image: weejewel/wg-easy:latest
    container_name: wireguard
    cap_add:
      - NET_ADMIN
      - SYS_MODULE
    environment:
      - WG_HOST=<your-public-ip-address>
      - PASSWORD=<your-very-secret-password>
      - WG_ALLOWED_IPS=<IP-ADDRESS-HERE> #see note 1 above
      - PEERDNS=auto
      - WG_DEFAULT_DNS=192.168.0.120 #the IP address of your Synology server (with Pi-hole instance)
    volumes:
      - /volume1/docker/wireguard:/etc/wireguard
    ports:
      - 51820:51820/udp
      - 51821:51821
    network_mode: "bridge"
    sysctls:
      - net.ipv4.conf.all.src_valid_mark=1
      - net.ipv4.ip_forward=1
    restart: unless-stopped
Installing Diun (optional)
- Pushover is my notification service of choice
- It’s a $5 one-time purchase
- Has Apps on iOS and Android
- Has a great API
- I’ve written about it before here
- Make a new directory in your docker folder called diun
- Create a new stack in Portainer and paste the following:
version: "3.8"

services:
  diun:
    image: crazymax/diun:latest
    network_mode: "bridge"
    container_name: diun
    volumes:
      - "/volume1/docker/diun:/data"
      - "/var/run/docker.sock:/var/run/docker.sock"
    environment:
      - "TZ=Africa/Windhoek"
      - "LOG_LEVEL=info"
      - "LOG_JSON=false"
      - "DIUN_WATCH_WORKERS=20"
      - "DIUN_WATCH_SCHEDULE=0 */6 * * *" #every 6 hours
      - "DIUN_PROVIDERS_DOCKER=true"
      - "DIUN_PROVIDERS_DOCKER_WATCHBYDEFAULT=true"
      - "DIUN_NOTIF_PUSHOVER_TOKEN=<pushover_token>"
      - "DIUN_NOTIF_PUSHOVER_RECIPIENT=<pushover_recipient>"
    restart: always
Create custom DNS entries in Pi-Hole and Reverse Proxy in Synology
- Log into HTTP://pi.hole
- Navigate to Local DNS -> DNS records
My configuration looks like this:

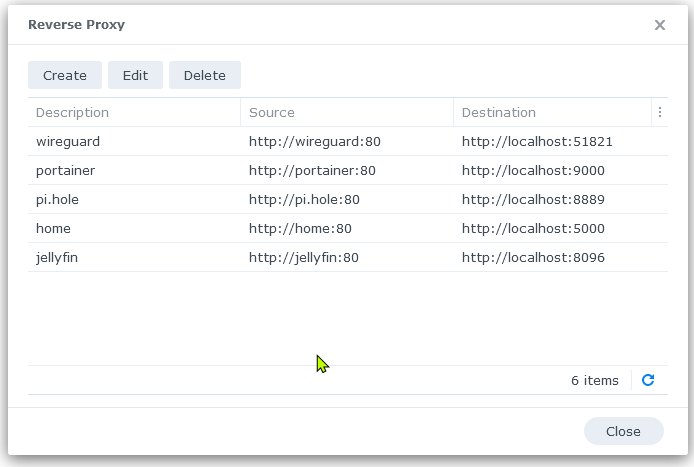
Then, in DSM, go to Control Panel -> Login Portal -> Advanced -> Reverse Proxy
My configuration looks like this:
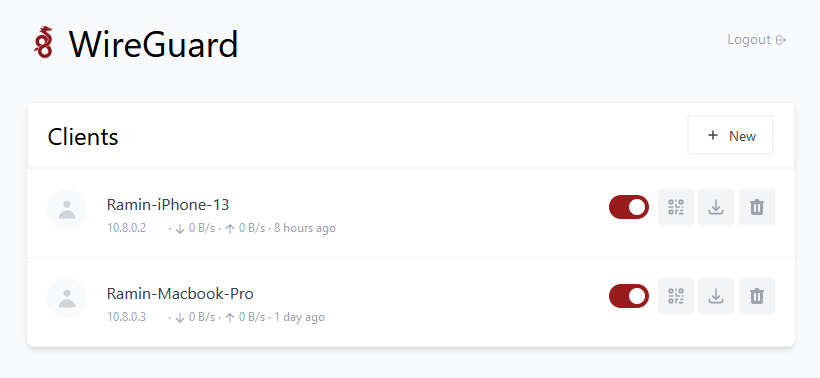
Set up Wireguard Clients and scan the QR code in Wireguard on your phone, or download and import the config file into your Wireguard client:
If you aren’t on the same network as your Synology, and need to access your services, activate the Wireguard split-tunnel you made and try to navigate to some addresses:
- To Access your Synology home, go to HTTP://home
- To access your Jellyfin, go to HTTP://jellyfin
Because it’s a split-tunnel, Wireguard won’t pass all internet traffic through your Synology (unless you set AllowedIPs to 0.0.0.0/0
Some other extra helpful tips
RAM
The DS920+ comes with 4GB of memory, and the official maximum is 8GB. I saw a couple of instances where the DS920+ ran on more than 8GB. I went with the recommendation here by Dennis Tsang about the Crucial 16GB, and it worked like a charm.
Extra Packages
SynoCommunity provides some useful, Open-source Community packages you can install
Transferring files from NAS to NAS
Setting up Wireguard also gives you the added benefit of being able to use it for file transfer between your NAS and another NAS offsite over the internet. Activate the Split-tunnel VPN, and mount the remote location. Copy files as you normally would with other folders. For some, this can be an alternative to the expensive Presto File Server offered by Synology (you would need a separate license for each NAS).